Dori it’s a four stars Electro character inside Genshin Impact and debuted in Sumeru 3.0 update. Dori is one of the first Electro characters with high synergy Dendro, allowing for new reactions and play styles for team compositions. Dori is mainly a support healer of the reaction which can be played in a myriad of forms. With the addition of Dendro, existing reactions and teams have undergone drastic changes and even Dori’s kit alone is somewhat difficult to understand. In this Genshin Impact guide, we’ll talk about everything you need to know Dori his builds and the materials needed for his ascension.
Dori in Genshin Impact: character introduction, play style and skill set
Dori is the owner of the Alcazarzaray Palace and is also a high-ranking merchant. Considering her stature of hers, she might not seem like much, but she’s infamous for getting their hands on anything for someone as long as they have enough of her Mora’s to pay her off. Not to mention the ridiculous prices she offers to her customers. In this guide, we will analyze Dori’s skills in Genshin Impact.
Dori’s style of play and skill set
| Name / Description | Guy |
|---|---|
| Wonderful sword dance | Normal attack |
| The skill performs up to 3 consecutive hits. | |
| Charged attack | |
| Drain stamina over time to perform continuous spin attacks against all nearby opponents. At the end of the sequence, he makes a more powerful cut. | |
| Swoop Attack | |
| Dives from mid-air to hit the ground below, damaging opponents along the way and dealing area DMG on impact. | |
| Spirit Protection Lamp: Problem Solver Cannon | Elementary Skill |
| Directs a spirit protection lamp to fire a troubleshooting shot at opponents, inflicting Electro DMG. After the troubleshooter hit, he will create 2 after-sales service rounds that will automatically track opponents and inflict Electro DMG. | |
| The accuracy of Alcazarzaray | Elemental Explosion |
| Summon the Jinni inside the lamp to give the client various types of help. Jinni Connects to a nearby character. The Connected Character: · Will continuously restore HP based on Dori’s maximum HP. · Will continuously regenerate energy. · Being influenced by Electro. When the connector between the Jinni and the character touches the opponents, it will inflict an instance of Electro DMG on them every 0.4 seconds. Only one Jinni can exist at a time. |
Dori’s passive talents
An eye for gold
After a character linked to Jinni has triggered an Electro-charged, Superconduct, Overcharged, Quicken, Aggravate, Hyperbloom reaction, or an Electro Swirl or Crystallize reaction. Spirit-Warding Lamp: Troubleshooter Cannon DC decreased by 1s. This effect can be activated once every 3 seconds.
Compound interest
For each point of Elemental Mastery Dori has, Fashioner’s Charged Attack and Tanglevine Tree DMG is increased by 0.06%. The maximum DMG bonus obtainable in this way is 60%.
Unexpected order
The skill has a 25% chance to recover some of the materials used when crafting character and weapon materials.
Talent leveling priorities
Elemental Blast> Elemental Ability> Normal Attacks
The constellations of Dori
In this Genshin Impact Dori guide, we will list its constellations.
| Constellation level | Name of the constellation | Effect |
|---|---|---|
| C1 | Additional investment | The number of after-sales service rounds created by Troubleshooter Shots is increased by 1. |
| C2 | Special franchise | When players are in combat and the Jinni heals the character it is attached to, it will cast a Jinni Toop from that character’s position which deals 50% of Dori’s ATK DMG. |
| C3 | The wonders never end | The skill increases Alcazarzaray’s accuracy level by 3. The maximum upgrade level is 15. |
| C4 | Discretionary surcharge | The character linked to the Jinni will get the following buffs based on their current HP and Energy. When their HP is below 50%, they get 50%
Oncoming Healing Bonus: When their energy is below 50%, they gain a 30% energy recharge. |
| C5 | Value for Mora | The skill increases the level of the Spirit Protection Lamp: Trouble Shooting Cannon by 3. The maximum update level is 15. |
| C6 | Spray the weight | Troubleshooting Cannon: Dori gains the following effects for 3 seconds after using the spirit protection lamp.
Electro Infusion: When normal attacks hit opponents, all nearby party members will heal HP equivalent to 4% of Dori’s maximum HP. This type of healing can occur once every 0.1 s. |
The best artifacts built for Dori in Genshin Impact
Main DPS / SUB DPS build
Dori can mainly be played as a Support character that can be a Healer or a reaction pad. In the role of healer, Dori will be purely a healer. For this, she is better equipped with a 4 pieces Noblesse Obblige for the enhancement of damage on the whole team oa 4 pieces of ocean-colored clams, which will provide some extra damage. Players can also use hybrid artifact sets such as 2pc as Maiden Beloved + 2pc Ocean color clam for even greater healing.

On reaction-based teams and Dendro teams, Dori can be equipped with Deepwood Memoirs or Sweet dreams, depending on the other characters on that team. Her entire kit has mixed attributes for EM and HP, which makes her a bit of a hassle to build, but also gives her some leeway for multiple team compositions. Dori can use the Sweet Dreams set which complements her passive talents to further increase the buffs she provides.
In Dendro’s compositions, he can use the Deepwood Memories artifact set. The 2pc effect is useless to her, but the 4pc effect can destroy the Dendro resistance of the targets by a large margin, and by using this set on Dori, she can free up other characters for more offensive artifact sets. In this guide, we will list the artifacts for the best artifact set build for Dori in Genshin Impact.
Manufactured goods
Ocean-colored clam
Set bonuses
- Bonus 2 pieces: + 15% healing bonus.
- Bonus 4 pieces: When the character equipping this artifact set heals a character in the party, a colored sea foam will appear for 3 seconds, accumulating the amount of HP recovered from healing (including overflow healing).
- At the end of the duration, the colored sea foam will explode, dealing DMG to nearby opponents based on 90% of the accumulated healing. (This DMG is calculated similarly to Reactions such as Electro Charge and Super Conduct, but is not affected by Elemental Mastery, Character Levels, or Reaction DMG Bonus.)
- Only one colored foam can be produced in the sea every 3.5 seconds.
- Each colored foam in the sea can accumulate up to 30,000 HP (including overflow cure).
- There can be no more than one colored foam in the sea active at any given time.
- This effect can still be activated even when the character using this artifact set is not on the battlefield.
Noble Obligation

Set bonuses
- 2 Piece Bonus: Elemental Burst DMG + 20%
- 4-Piece Bonus: Using an Elemental Burst increases the ATK of all party members by 20% for 12 seconds. This effect cannot stack.
Deepwood Memoirs

Set bonuses
- 2 pieces: Dendro DMG bonus + 15%.
- 4 pieces: After elemental abilities or explosions hit opponents, the targets’ Dendro Res will be reduced by 30% for 8 seconds. This effect can be activated even if the character equipping it is not on the battlefield.
Sweet dreams

Set bonuses
- Bonus 2 pieces: Elemental Mastery +80
- Bonus 4 pieces: Within 8 seconds of activating an Elemental Reaction, the character who equips it will get buffs based on the Elemental Type of the other party members, the ATK is increased by 14% for each party member whose Elemental Type is the same character who is equipping it, and Elemental Mastery is increased by 50 for each party member with a different element type. Each of the aforementioned buffs will count up to 3 characters. This effect can be activated once every 8s. The character who equips it can still activate its effects when not on the field.
Priority to artifact statistics
To maximize the support potential for any character, minimum maximum will always have the utmost importance. Dori primarily uses her Elemental Burst to heal and provide a reaction utility that determines which sub-stat should be prioritized. The build of the healer will have HP% sands, HP% chalice and bonus healing circle, while the reaction build will have EM Sands, EM Chalice and Headband it can be based on any statistic you need most. Players should aim to exceed the ER% threshold first, because, in optimal rotations, its burst is very important and is the main utility. Once ER% is not an issue, players need to focus on increasing ER% / EM / HP% as required.
Note: If Dori uses the Favonius Greatsword, you should also focus on building a critical rate sufficient to activate the weapon’s passive effect which can provide extra energy to the whole team.
Desired substats: ER% / EM / HP%
| Type of artifact | Main statistic | Priority to secondary stats |
|---|---|---|
| Flower | HP | ER% / EM / HP%> ATK% |
| Plume | ATK | ER% / EM / HP%> ATK% |
| Sands | ER% / EM / HP% | ER% / EM / HP%> ATK% |
| Chalice | HP% / EM | ER% / EM / HP%> ATK% |
| Headband | Healing Bonus / CR% / DC% | ER% / EM / HP%> ATK% |
ER% requirement for Dori
Dori’s main source of healing comes from her Elemental Burst which is very expensive and without a dedicated battery, it will require a lot of ER% on her to use the blast more often. The ER% threshold depends on which team Dori is used in, but to be on the safe side, aim for at least 210+ ER%.
Dori has many choices in the 4-star weapon category for energy reloading weapons, which makes it much easier to reach the required threshold.
The best weapons for Dori
Dori’s Elemental Burst has an energy cost of 80 which means that in most scenarios she will need an ER% Claymore to use her torso efficiently. Greatsword of Favonius and Regalia of the Forest they are very strong choices for her, based on the type of role she will play in the team. To play the role of healer, Favonius Greatsword is your best choice. If he is part of a Dendro team or a reaction team, it is best to use the Regalia of the forest, which provides extra buffs, based on Dendro’s reactions. In this section, we will discuss the best weapons for Dori in Genshin Impact.
Dori can also alternately use weapons such as Skyward Claymore and Sacrificial Greatsword, but they won’t live up to the above weapons due to less synergy with Dori. The Bell is also not a good choice for Dori, as the weapon has no ER%, as the secondary stat that would make the Burst reload faster.
Note Weapon rankings should be taken as a reference only as damage numbers can vary depending on multiple factors, team compositions, characters, artifacts and rotations. So, test your characters to see which weapon is best for them.
Weapon ranking for five-star weapons
Favonius Greatsword = Forest Regalia> Skyward Claymore = Sacrificial Greatsword> The Bell
Favonio broadsword
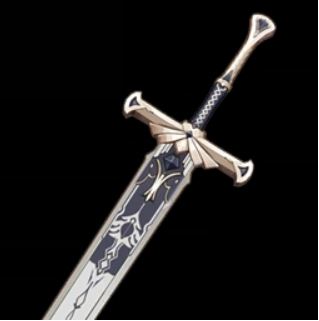
- Basic ATK– 454 (Level – 90)
- Substate- 61.3% energy recharge
- Weapon Passive: Manna
CRIT hits have a 60% chance to generate a small amount of Elemental Particles, which will regenerate 6 Energy for the character. It can only occur once every 12 seconds.
Regalia of the forest

- Basic ATK– 565 (Level – 90)
- Substate- 30.6% energy recharge
- Passive weapon: Sanctuary of the forest
After activating Burning, Quicken, Aggravate, Spread, Bloom, Hyperbloom or Burgeon, a Leaf of Consciousness will be created around the character for up to 10 seconds. When picked up, the Leaf will grant you 60 Elemental Mastery for 12 sec. Only 1 Leaf can be spawned in this way every 20 sec. This effect can still be activated if the character is not on the field. The Leaf of Consciousness effect cannot stack.
Blade to the sky
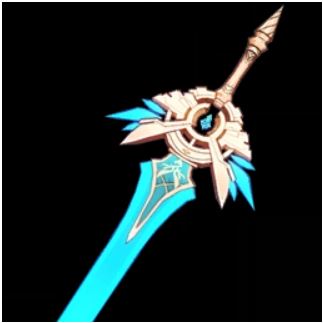
- Basic ATK– 608 (Level – 90)
- Substate– 55.1% energy recharge
- Passive weapon: Sky-Piercing Fang
CRIT rate increased by 4%. Gain Skypiercing Might using an Elemental Burst – Increases Movement SPD by 10%, Boosts ATK ATK by 10%, and Normal and Charged Hits deal additional DMG equal to 20% ATK. Skypiercing Might lasts 12 seconds.
Sacrificial broadsword

- Basic ATK– 565 (Level – 90)
- Substate- 40.6% energy recharge
- Weapon Passive: Composed
After dealing damage to an opponent with an elemental ability, the ability has a 40% chance to run out of its DC. It can only occur once every 30 seconds.
The bell

- Basic ATK– 510 (Level – 90)
- Substate- 41.3% HP
- Weapon Passive: Rebel Guardian
Taking DMG generates a shield that absorbs DMG up to 20% of maximum HP. This shield lasts 10 seconds or until it breaks and can only be activated once every 45 seconds. While protected by a shield, the character gains 12% increased DMG.
Dori Materials Requirements for Ascension
We will discuss ascension materials for Dori leveling and ascension up to max level 90.
| Ascension level | Ascension materials |
|---|---|
| Level: 0-20 | 1x Vajrada Amethyst Silver, 3x Faded Red Satin, 3x Kalpalata Lotus, 20k Blackberry |
| Level: 20 – 40 | 3x Vajrada Amethyst Shard, 2x Thunderclap Fruit Core, 15x Faded Red Satin, 10x Kalpalata Lotus, 40k Blackberry |
| Level: 40-50 | 6x Vajrada Amethyst Shard, 4x Thunderclap Fruit Core, 12x Trimmed Red Silk, 20x Kalpalata Lotus, 60k Blackberry |
| Level: 50-60 | 3x Vajrada Amethyst Piece, 8x Thunderclap Fruit Core, 18x Trimmed Red Silk, 30x Kalpalata Lotus, 80k Blackberry |
| Level: 60 – 70 | 6x Vajrada Amethyst Piece, 12x Thunderclap Fruit Core, 12x Deep Red Brocade, 45x Kalpalata Lotus, 100k Blackberry |
| Level: 70 – 80 + | 6x Vajrada Amethyst Gemstone, 20x Thunderclap Fruit Core, 24x Deep Red Brocade, 60x Kalpalata Lotus, 120k Blackberry |
Materials to enhance talents
In this Genshin Impact Dori guide, we will list the materials needed to level up skill talents, through each level.
| Goal level | Required materials |
|---|---|
| Level 1 | – |
| Level 2 | 3x Teachings of Ingenuity, 6x Faded Red Satin, x12500 Blackberry |
| Level 3 | 2x Ingenuity Guide, 3x Trimmed Red Silk, x17500 Blackberry |
| Level 4 | 4x Ingenuity Guide, 4x Trimmed Red Silk, x25000 Blackberry |
| Level 5 | 6x Ingenuity Guide, 6x Trimmed Red Silk, x30000 Blackberry |
| Level 6 | 9x Ingenuity Guide, 9x Trimmed Red Silk, x37500 Blackberry |
| Level 7 | 4 Philosophies of Ingenuity, 4 Rich Red Brocade, 1 Bloody Jade Branch, Blackberry x120000 |
| Level 8 | 6 Philosophies of Ingenuity, 6 Rich Red Brocade, 1 Bloody Jade Branch, Blackberry x260000 |
| Level 9 | 12 Philosophies of Ingenuity, 9 Rich Red Brocade, 2 Blood Jade Branches, Blackberry x450000 |
| Level 10 | 16 Philosophies of Ingenuity, 12 Rich Red Brocade, 2 Bloody Jade Branch, 1 Crown of Insight, x700000 Blackberry |
Special dish

- First name: Show me the Mora
- Game description: Dori’s specialty.
After paying a large sum of Mora, players will finally have the chance to taste the dish cooked by Lord Sangemah Bay herself. Boiled chicken is coated in a silky sauce with a soft texture. With the mind-controlling charm of its great flavor, this dish is spurring the player to spend another fortune just to grab another bite!
Food effect: Boosts the ATK of all party members by 274 for 300 seconds. In co-op, this effect only applies to your characters.
What do you think of the Genshin Impact Dori Guide? Do you have any other tips mentioned not in our guide, for playing Dori in Genshin Impact? Let us know in the comments section below!






Start a new Thread